
Antminer E3 – Firmware Mod for Ethereum Classic
After suffering countless 51% attacks, Ethereum Classic on November 29, 2020, successfully implemented the Thanos update, effectively bringing the DAG to a fixed limit and allowing the Classic network to regain its security level by guaranteeing graphics processors with 4GB of memory to return again to validate the transactions.
However, this made Antminer E3 unusable, as the mining algorithm was changed to etchash making the default version of the ethash solver provided by Bitmain unusable. Some sources connected to Bitmain, have highlighted the existence of a firmware in beta, able to perform an update of the solver stock (In all probability, the parent company did not want to release a fix of this type in anticipation of the release of a future dedicated ASIC). Being a development version, the software is locked and licensed to a single machine, and cannot be used directly through the common firmware update procedure.
Thanks to the work of our technicians, we have recovered and modified it, to guarantee you access to our dedicated Mining Pool, finally giving new life to your Antminer E3.
How to apply the update
Download the modification package from this link (attention, being an ssh injector, it could be reported by your antivirus as a false positive), start your E3, unpack the fix and follow our guide.
Step 1
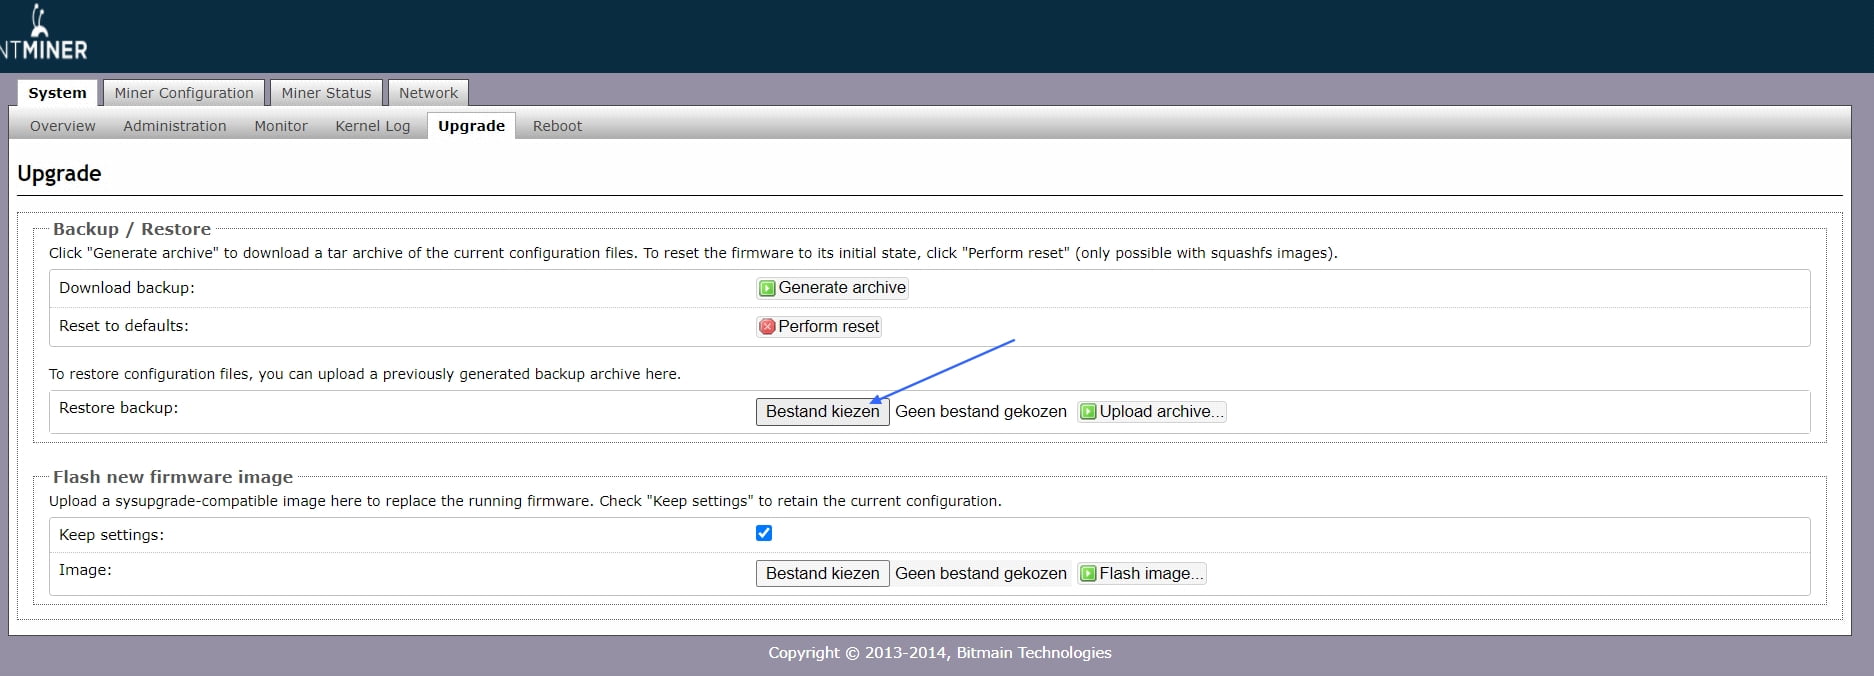
Find your miner’s IP address, login via web using root as username and root as password. Move to the System menu and the update tab. Upload the mac-change.tar file as a backup. In doing so we will associate the mac address used by bitmain for the beta to our mine.
Step 2
Now the IP address of your E3 will be changed, find it using a common IP scanner or by connecting to the devices page of your router. Once found, make sure its mac address ends with D1: D9. Save the new IP address.

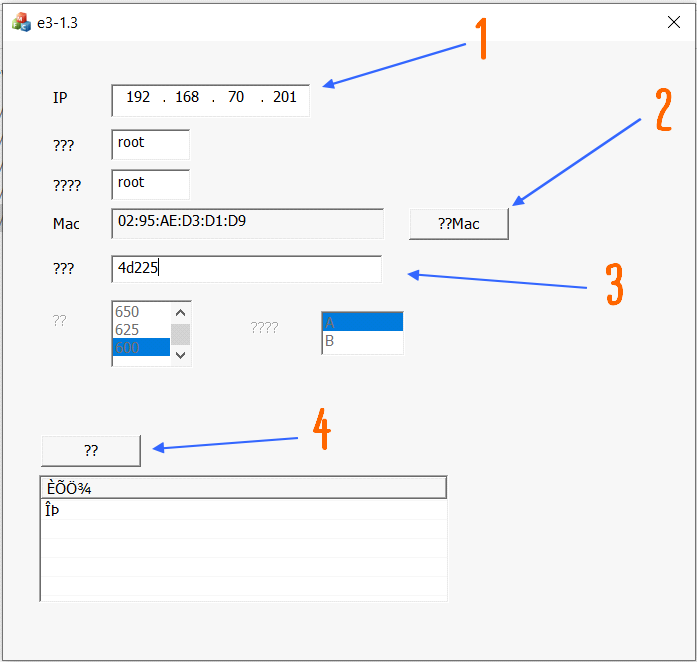
Inside the Step 2 folder, open the Update.exe executable, copy the new IP address you just saved in the box above (fig.1), and press the ?? Mac button (fig.2).
This should load your antminer data, along with the previously modified mac address. Verify that it matches 02: 95: AE: D3: D1: D9.
In the field ??? we must enter this unlock code (picture. 3): 4d225
Finally we will do nothing but validate the data by pressing the button ??? (picture. 4).
Now wait 2-3 minutes, and close the application.
Step 3
Now we have to repeat exactly what we did in the previous step, but using the executable present in the Step 3 folder.
Then open the Update.exe executable, copy your IP address again in the box above (picture.1), press the ?? Mac button (picture.2).
This will load your antminer data again, along with the previously modified mac address. Always check that it matches 02: 95: AE: D3: D1: D9.
In the field ??? we have to enter this again the unlock code (picture. 3): 4d225
We still validate the data entered by pressing the button ??? (picture. 4).
Now wait 2-3 minutes, and close the application.
Now you just have to go back to the web interface and change the default username with your ETC receiving address.
Within 5-10 minutes, your E3 will open a link to our pool returning to its former glory.
Step 4 Extra (If you have more than one Antminer E3)
Log in via the web using root as the username and root as the password. Move to the System menu and the update tab. Upload the file fix_mac.tar (found in the Step 4 folder) from the firmware update module (so not like when uploading a backup). By doing so we will reset the mac address of our machine, so as not to have an IP or mac address conflict. (Consequently, a new IP scan will be required to retrieve the new web address of your Antminer)
If you need support, write it below in the comments.
Happy mining!